I know there are many people out there who purchased a Steam Deck to do nothing more than emulate old retro games. But it can take a lot of time researching the correct build of an emulator to install, launch it, configure its settings and hotkeys, and then point the ROM directory to the correct folder.
Even if you know exactly where to go and what to do, the amount of time it would take to repeat this for 10+ other consoles can be tedious.
This is where EmuDeck comes into play.
Not only will this tool download and install the correct version for you, but it will also go in and set everything up for you. From the hotkeys to the ROM directories, to the BIOS folders, etc. The folks behind this project even through in some other niceties like LCD and CRT Shaders, widescreen support, and more.
All of this, plus it will also make it easy to install popular SteamOS mods like the Power Tools Decky Loader plugin and a tool to compress your ROM all of your ROMs.
There’s a lot to unpack here but what better way to get to know a toolkit like this than to dive right in? So here today, I’ll walk you through where to download this project, how you can install it, and how to configure SteamOS so that your emulators will show up while you are in Gaming Mode. The goal here is to work on just the basics to that you’re able to play your favorite retro games.
Downloading EmuDeck
The first thing you’ll need to do is download EmuDeck onto the Steam Deck. This will require you to reboot over into Desktop Mode and then open up a Web Browser. I installed Firefox on mine, since it was right there in the taskbar, but you could install Chrome or other popular browsers from the Discover application. Once it has been installed, open it up and then visit the EmuDeck website.
At the top of the website you should see a link labeled “Download” but you could also just scroll down to the download button as well. Naturally, you’ll want to download the SteamOS version of EmuDeck. When it’s finished downloading, move it to the Desktop of the Steam Deck so you can execute it properly with double-clicking the icon.
You’ll be asked if you want to run the install script, so confirm that was your intention.
A terminal window will appear and some white text will appear on the screen. This is the file you just opened, downloading the latest version of EmuDeck and then launching the installer script.
Setting up EmuDeck
After the download is complete, you’ll be greeted with a screen that asks you if you want to choose Easy Mode or Custom Mode. If you’re in a hurry then you should certainly choose Easy Mode as that will get you through the process the fastest. But I encourage you to choose Custom Mode so that you’re more aware of what this toolkit is actually doing when it installs onto your Steam Deck.
So go ahead and click Custom Mode.
Choosing the ROM Directory
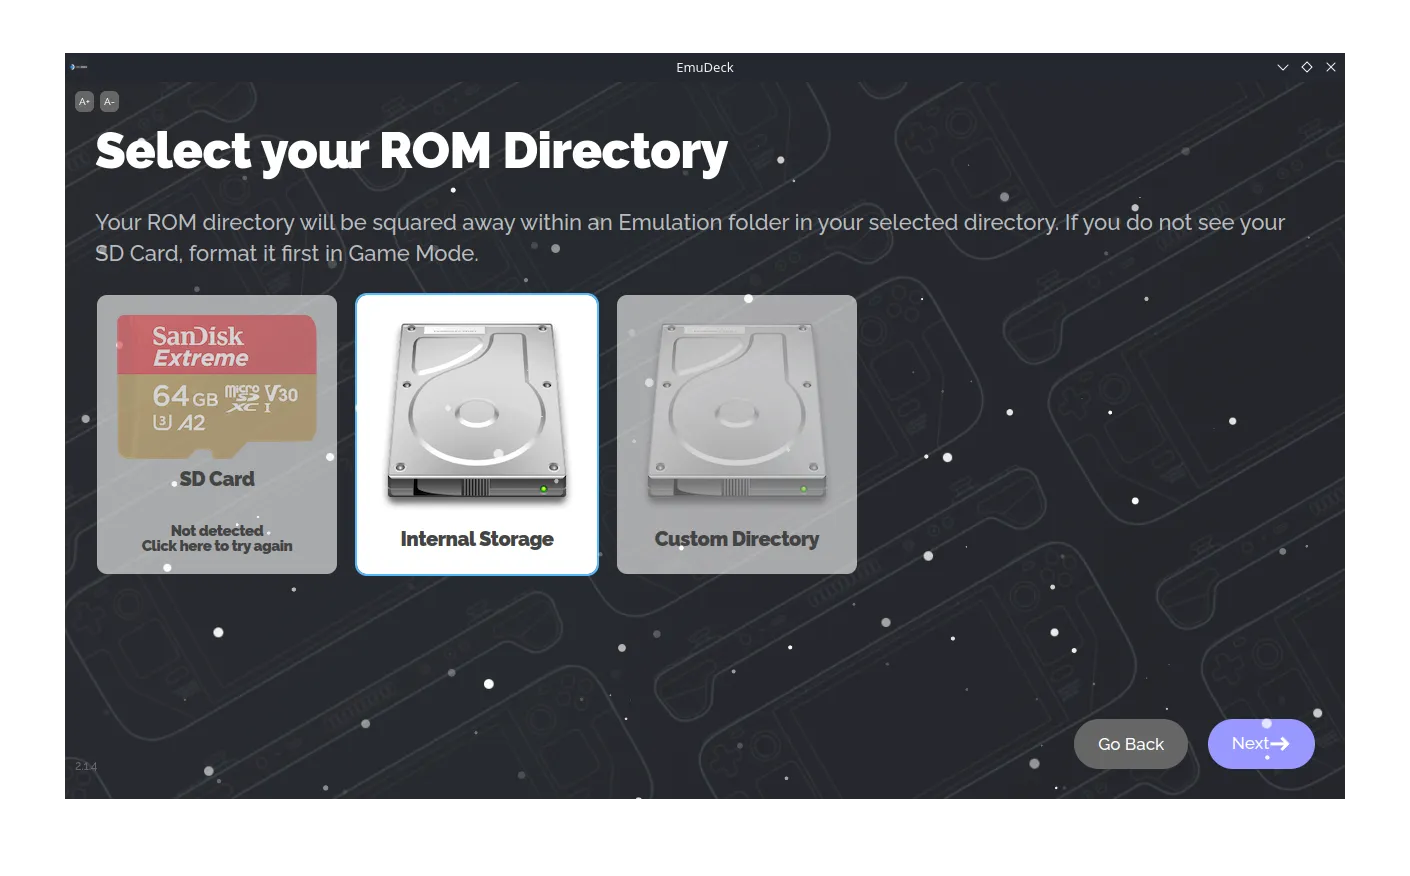
EmuDeck will then ask you where you want your ROM directory to be setup. This toolkit is going to create your entire directory tree for all of the emulators you install and it needs to know where you want them. You have the choice between a microSD card, the /home directory of your internal storage, or a custom directory somewhere on the internal storage as well.
Your emulators are going to be installed to the internal storage anywhere, this just wants to know where you want to load your ROM files from.

This is the SD card I picked up for my Steam Deck OLED, and it’s been great. I haven’t had any issues with loading speed or reliability. Please do not skimp out on a quality microSD card if you plan on using one. Losing all of your save files, ROMs, and BIOS files from using a knock-off brand can be gut-wrenching.
After you select the location for your ROM files, EmuDeck will ask you to select your device. So we’re going to be clicking on Steam Deck and then going to the next step.
Pick Your Emulators
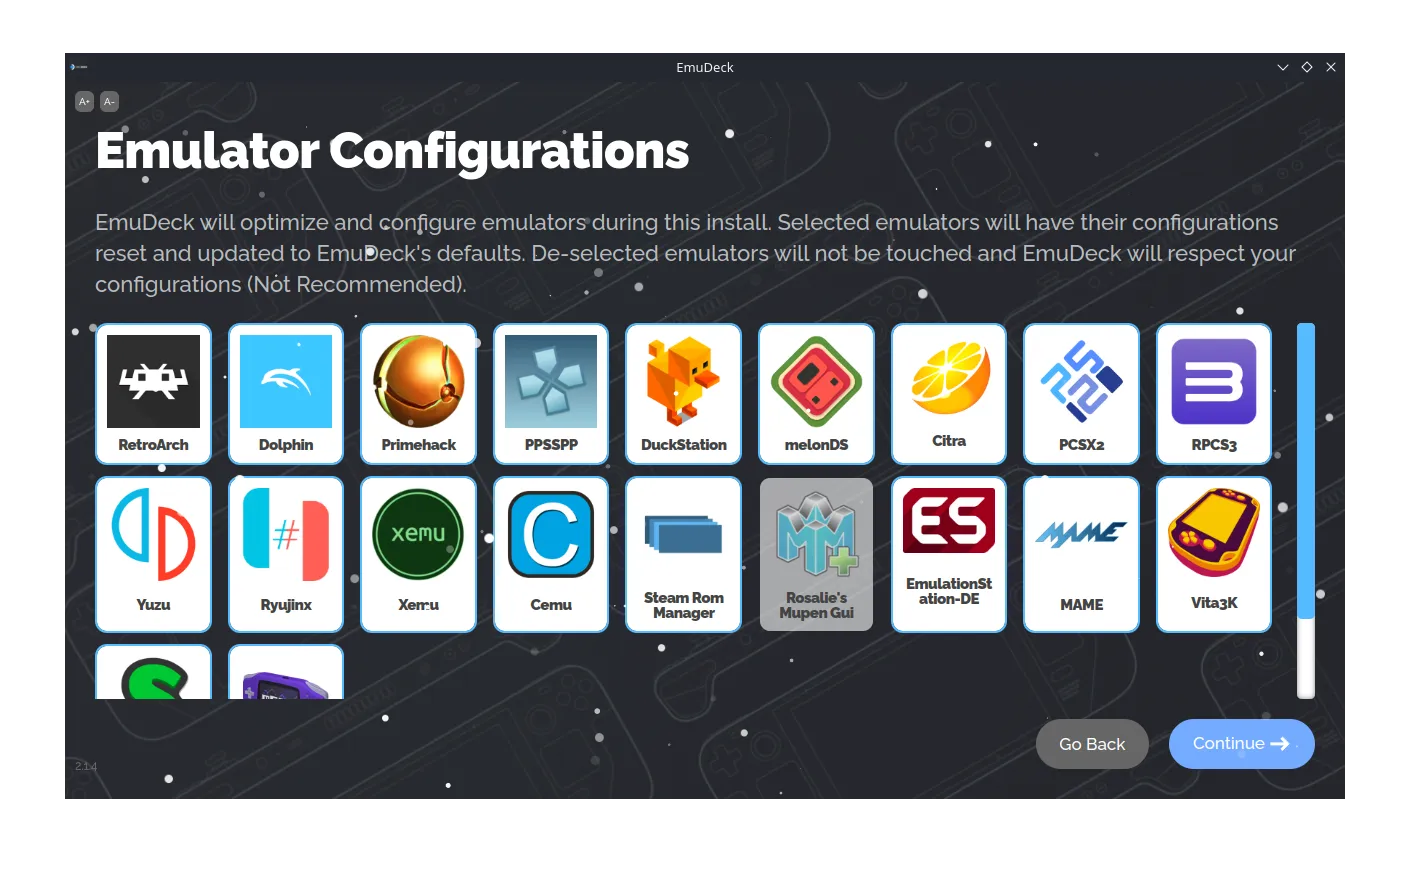
Now you will be asked which emulators you want to install and which emulators you want to ignore. By default, you’ll see that most of them are going to be selected for you, but a few of them (like MAME) will be grayed out already. The ones that are selected will be installed by this toolkit, so go through and pick which emulators you want EmuDeck to install for you.
You can always come back and install or remove an emulator after it’s all setup.
So there’s no need to worry about missing out. You can choose to leave off most of the emulators if you just don’t have any ROMs for them at the moment. Then when you’re ready to dive into a new batch of games, you can go in and have EmuDeck install it for you. It just depends on how you want your Steam Deck setup right now.
Configure the Emulators
Then you will be asked which emulators you want EmuDeck to configure for you. So just like before, if an emulator is selected (highlighted) then that means EmuDeck will configure it for you. There’s a lot that goes into this configuration too, including telling the emulator where your ROMs are, setting specific hotkeys to work across multiple emulators, and more.
I let EmuDeck configure every emulator that I told it to install.
This was a major reason why I wanted to use EmuDeck to begin with. I just don’t have the time to setup 10+ emulators all at once and I really like the idea of getting all of that legwork done and out of the way. But if you want to do this yourself, I certainly understand the joy that can bring. So you can deselect (gray out) the emulators you want EmuDeck to let you configure on your own time.
EmuDeck Extras
There are a number of features the team behind EmuDeck has included that make a lot of sense. Like enabling an Auto Save feature for select consoles where a save state is created when the app detects it has been closed. Then, the next time you open up that emulator, it will load up that save state for you.
RetroAchievements Integration
You can have certain emulators like DuckStation, PCSX2, and RetroArch monitor your progress and aware you achievements for these retro games that never officially had them to begin with. You will need to sign up with a free account on their website and then login with your account on the Steam Deck.
Optional Game Bezels
Many of these emulators don’t play games in the same aspect ratio of the Steam Deck. This results in a number of games having black bars on the left and right sides of the screen. So in an attempt to cover those up you can choose to enable themed bezels during gameplay.

Custom Aspect Ratio
Speaking of aspect ratios, some of these emulators offer a way to change the original to fit modern screens. For example, you can choose to play SNES games in the default 4:3 aspect ratio, a wider 3:2 aspect for smaller black bars, or its true resolution of 8:7.
Custom Shaders
They’ve also added a couple of shaders that you can enable if you’d like. The GameBoy, GameBoy Color, GameGear, and NeoGeo Pocket, for example, can have an LCD Shader enabled for a more authentic look. PS1, Dreamcast, Saturn, and N64 games can have a CRT Shader enabled.
Wrapping Things Up
After you have chosen all of that, you will see a screen that shows you every emulator EmuDeck will install, all the emulators EmuDeck will configure for you, the extra customizations you selected, and the install directory. Simply click on the Finish button in the bottom right corner and let the toolkit download your chosen emulators, configure the ones you selected, and then enable any optional features.
The amount of time this takes will depend on how many emulators you’re installing and how fast your internet speed is.
So sit back, watch the Steam Deck so that it doesn’t go to sleep, and let EmuDeck do all of that work for you. You can even watch the log file as it goes through the script. When it finishes, an Installation Complete screen will appear with a status icon next to each task you gave it. If an emulator was installed correctly then it will have a green checkmark. If something went wrong it will have a red X next to it.
Adding Emulators to Steam for Gaming Mode
While you have officially completed everything, there’s one last thing I think you should take a look at. There are a number of community developed tools shown at the bottom of the EmuDeck window. This is the screen that will appear when you finish setting it all up and it will also appear each time you open the program post installation.
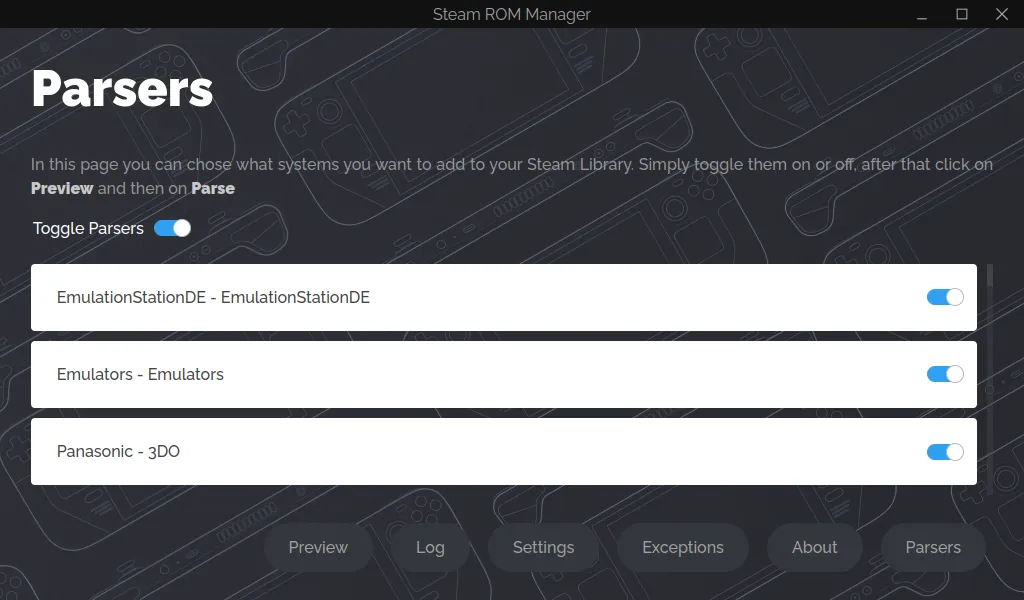
There’s one tool here called Steam ROM Manager that I recommend you take a look at.
It’s a bit confusing at first glance, but it’s a quick way for us to add non-Steam games to the Steam library of our Steam Deck. My main use for it is adding all of the emulators we just installed with EmuDeck without having to do it manually. So go ahead click it to load up the program.
The first time you visit this page, I recommend toggling everything off. Then, going through the list and enabling the toggle for EmulationStation, the Emulators category, and the individual emulators that you want showing up in Gaming Mode of your Steam Deck. If you fail to do this manually, and let the program add everything, then your non-Steam library is likely to be bloated with emulators you’ll probably never use.
When you’re happy with your selection, click on the Preview button and then click Save to Steam.
That’s it. You can now close everything out and reboot back into Gaming Mode.
Installing EmuDeck on the Steam Deck
Conclusion
I can understand why some people would feel intimidated about installing something like EmuDeck. When you trust a toolkit like this to do so much work, any little slip up can ruin the entire experience.